
> ## Documentation Index
> Fetch the complete documentation index at: https://ampersand-24eb5c1a-mintlify-0330937e.mintlify.site/llms.txt
> Use this file to discover all available pages before exploring further.

# SurveyMonkey

## What's supported

### Supported actions

This connector supports:

* [Read Actions](/read-actions), including full historic backfill.
* [Write Actions](/write-actions) (create, update, and delete — depending on the object).
* [Proxy Actions](/proxy-actions), using the base URL `https://api.surveymonkey.com`.
* Subscribe Actions are not currently supported.

### Supported objects

export const Check = () => <span>✅</span>;
export const Cross = () => <span>🚫</span>;

<div style={{ width: '100%', overflowX: 'auto' }}>
  <table style={{ width: '100%', minWidth: '1000px', tableLayout: 'fixed', textAlign: 'center', borderCollapse: 'collapse' }}>
    <thead>
      <tr style={{ width: '100%' }}>
        <th style={{ textAlign: 'left', width: '44%' }}>Object</th>
        <th style={{ width: '11.2%' }}>Metadata</th>
        <th style={{ width: '11.2%' }}>Read</th>
        <th style={{ width: '11.2%' }}>Write</th>
        <th style={{ width: '11.2%' }}>Subscribe</th>
      </tr>
    </thead>

    <tbody>
      <tr><td style={{ textAlign: 'left' }}><a href="https://api.surveymonkey.com/v3/docs#api-endpoints-get-benchmark_bundles">benchmark\_bundles</a></td><td><Check /></td><td><Check /></td><td><Cross /></td><td><Cross /></td></tr>
      <tr><td style={{ textAlign: 'left' }}><a href="https://api.surveymonkey.com/v3/docs#api-endpoints-get-contact_fields">contact\_fields</a></td><td><Check /></td><td><Check /></td><td><Check /></td><td><Cross /></td></tr>
      <tr><td style={{ textAlign: 'left' }}><a href="https://api.surveymonkey.com/v3/docs#api-endpoints-get-contact_lists">contact\_lists</a></td><td><Check /></td><td><Check /></td><td><Check /></td><td><Cross /></td></tr>
      <tr><td style={{ textAlign: 'left' }}><a href="https://api.surveymonkey.com/v3/docs#api-endpoints-get-contacts">contacts</a></td><td><Check /></td><td><Check /></td><td><Check /></td><td><Cross /></td></tr>
      <tr><td style={{ textAlign: 'left' }}><a href="https://api.surveymonkey.com/v3/docs#api-endpoints-get-groups">groups</a></td><td><Check /></td><td><Check /></td><td><Cross /></td><td><Cross /></td></tr>
      <tr><td style={{ textAlign: 'left' }}><a href="https://api.surveymonkey.com/v3/docs#api-endpoints-get-organizations">organizations</a></td><td><Check /></td><td><Check /></td><td><Cross /></td><td><Cross /></td></tr>
      <tr><td style={{ textAlign: 'left' }}><a href="https://api.surveymonkey.com/v3/docs#api-endpoints-get-question_bank-questions">question\_bank\_questions</a></td><td><Check /></td><td><Check /></td><td><Cross /></td><td><Cross /></td></tr>
      <tr><td style={{ textAlign: 'left' }}><a href="https://api.surveymonkey.com/v3/docs#api-endpoints-get-roles">roles</a></td><td><Check /></td><td><Check /></td><td><Cross /></td><td><Cross /></td></tr>
      <tr><td style={{ textAlign: 'left' }}><a href="https://api.surveymonkey.com/v3/docs#api-endpoints-get-survey_categories">survey\_categories</a></td><td><Check /></td><td><Check /></td><td><Cross /></td><td><Cross /></td></tr>
      <tr><td style={{ textAlign: 'left' }}><a href="https://api.surveymonkey.com/v3/docs#api-endpoints-get-survey_folders">survey\_folders</a></td><td><Check /></td><td><Check /></td><td><Check /></td><td><Cross /></td></tr>
      <tr><td style={{ textAlign: 'left' }}><a href="https://api.surveymonkey.com/v3/docs#api-endpoints-get-survey_languages">survey\_languages</a></td><td><Check /></td><td><Check /></td><td><Cross /></td><td><Cross /></td></tr>
      <tr><td style={{ textAlign: 'left' }}><a href="https://api.surveymonkey.com/v3/docs#api-endpoints-get-survey_templates">survey\_templates</a></td><td><Check /></td><td><Check /></td><td><Cross /></td><td><Cross /></td></tr>
      <tr><td style={{ textAlign: 'left' }}><a href="https://api.surveymonkey.com/v3/docs#api-endpoints-get-surveys">surveys</a></td><td><Check /></td><td><Check /></td><td><Check /></td><td><Cross /></td></tr>
      <tr><td style={{ textAlign: 'left' }}><a href="https://api.surveymonkey.com/v3/docs#api-endpoints-get-team_survey_templates">team\_survey\_templates</a></td><td><Check /></td><td><Check /></td><td><Cross /></td><td><Cross /></td></tr>
      <tr><td style={{ textAlign: 'left' }}><a href="https://api.surveymonkey.com/v3/docs#api-endpoints-get-workgroups">workgroups</a></td><td><Check /></td><td><Check /></td><td><Cross /></td><td><Cross /></td></tr>
    </tbody>
  </table>
</div>

### Notes and limitations

* **Write support**
  * `contacts`, `contact_lists`, `surveys`: create, update, and delete
  * `survey_folders`: create only
  * `contact_fields`: update only (label)
* **Not available as objects:** survey responses, collectors, survey pages, survey questions, and webhooks. Use [Proxy Actions](/proxy-actions) if you need access to other SurveyMonkey API endpoints.

### Example integration

For an example manifest file of a SurveyMonkey integration, visit our [samples repo on Github](https://github.com/amp-labs/samples/blob/main/surveyMonkey/amp.yaml).

## Before you get started

To connect SurveyMonkey with Ampersand, you need to [create a SurveyMonkey account](#create-a-surveymonkey-account) and obtain the following credentials from your SurveyMonkey app:

* Client ID
* Client Secret

You will use these credentials to connect your application to Ampersand.

### Create a SurveyMonkey account

You need a **SurveyMonkey** account to connect with Ampersand. If you do not have a SurveyMonkey account, here's how you can sign up:

* Go to the [SurveyMonkey site](https://www.surveymonkey.com/).
* Sign up for a free account using your preferred method.

### Creating a SurveyMonkey app

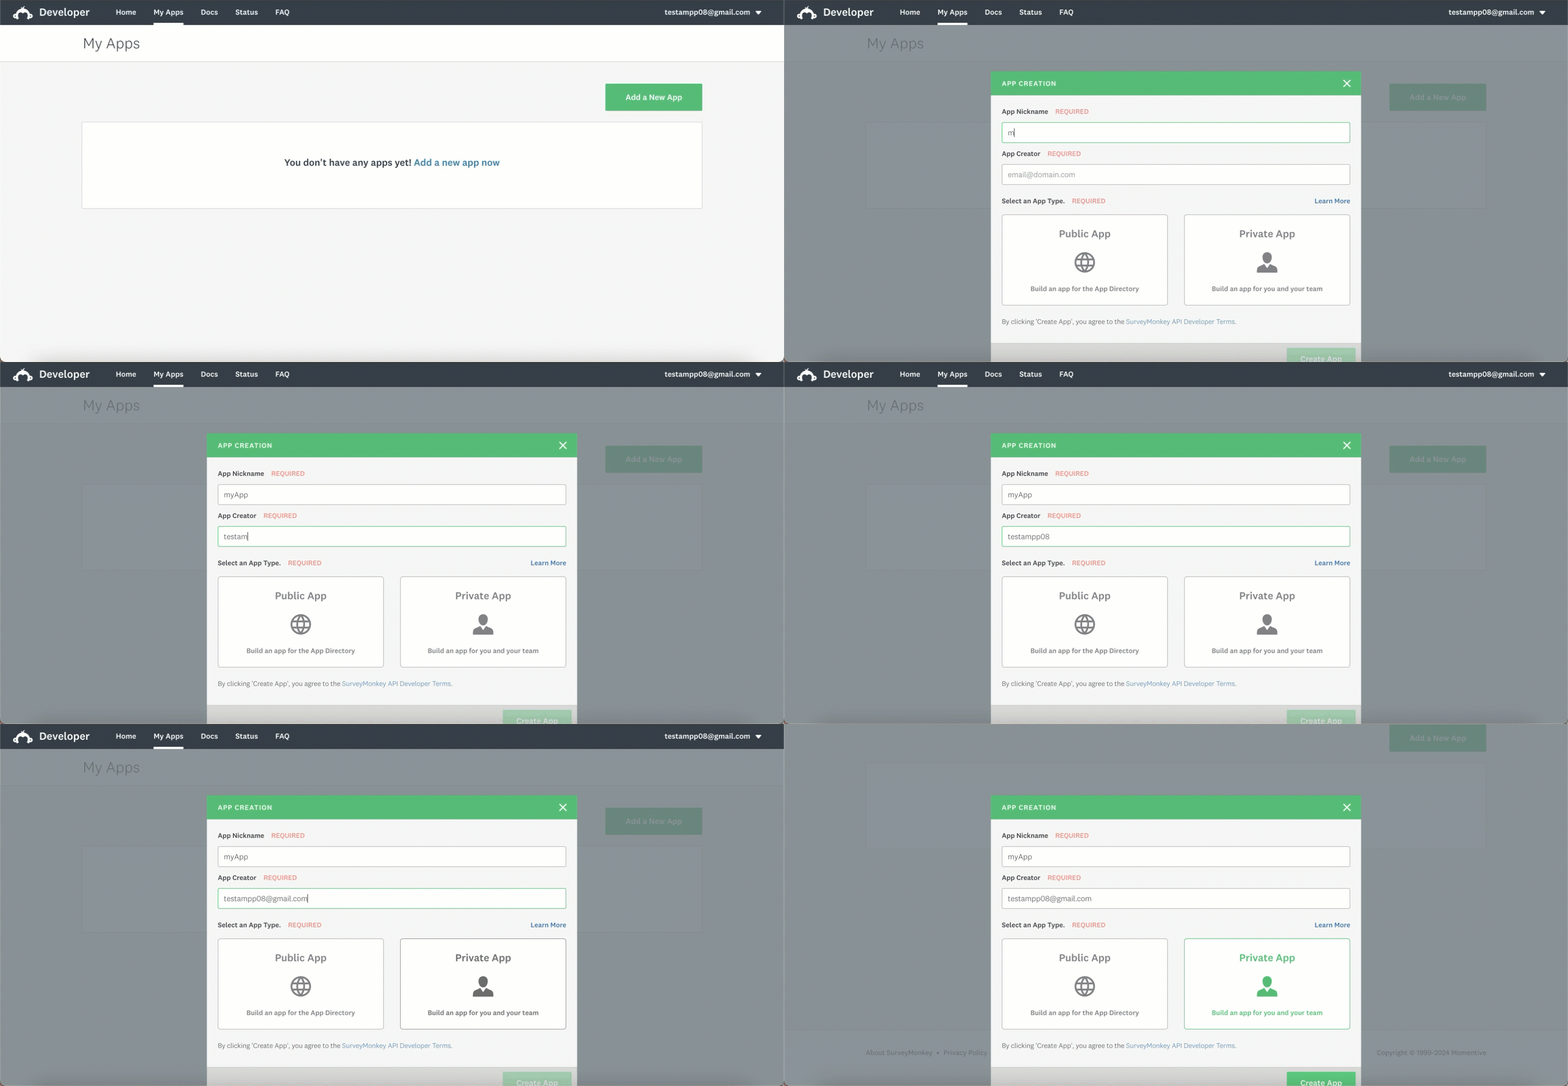
1. Log in to the [SurveyMonkey Developer Portal](https://developer.surveymonkey.com/).

2. Click the **Create a New App** button.

3. On the *Create a New App* form, enter the following details:
   1. **App Name**: The name of the app.
   2. **App Creator**: Email address of the app owner.
   3. **Select an app type**: Specify whether the application should be private or public.

4. Click **Create App**.

   <img src="https://mintcdn.com/ampersand-24eb5c1a-mintlify-0330937e/gQAqO21AV09VniR2/images/provider-guides/05fd68a-surveymonkey1.gif?s=483c9e455800302792c4bf164c3d2daa" alt="SurveyMonkey App Details" width="1440" height="666" data-path="images/provider-guides/05fd68a-surveymonkey1.gif" />

   <br />

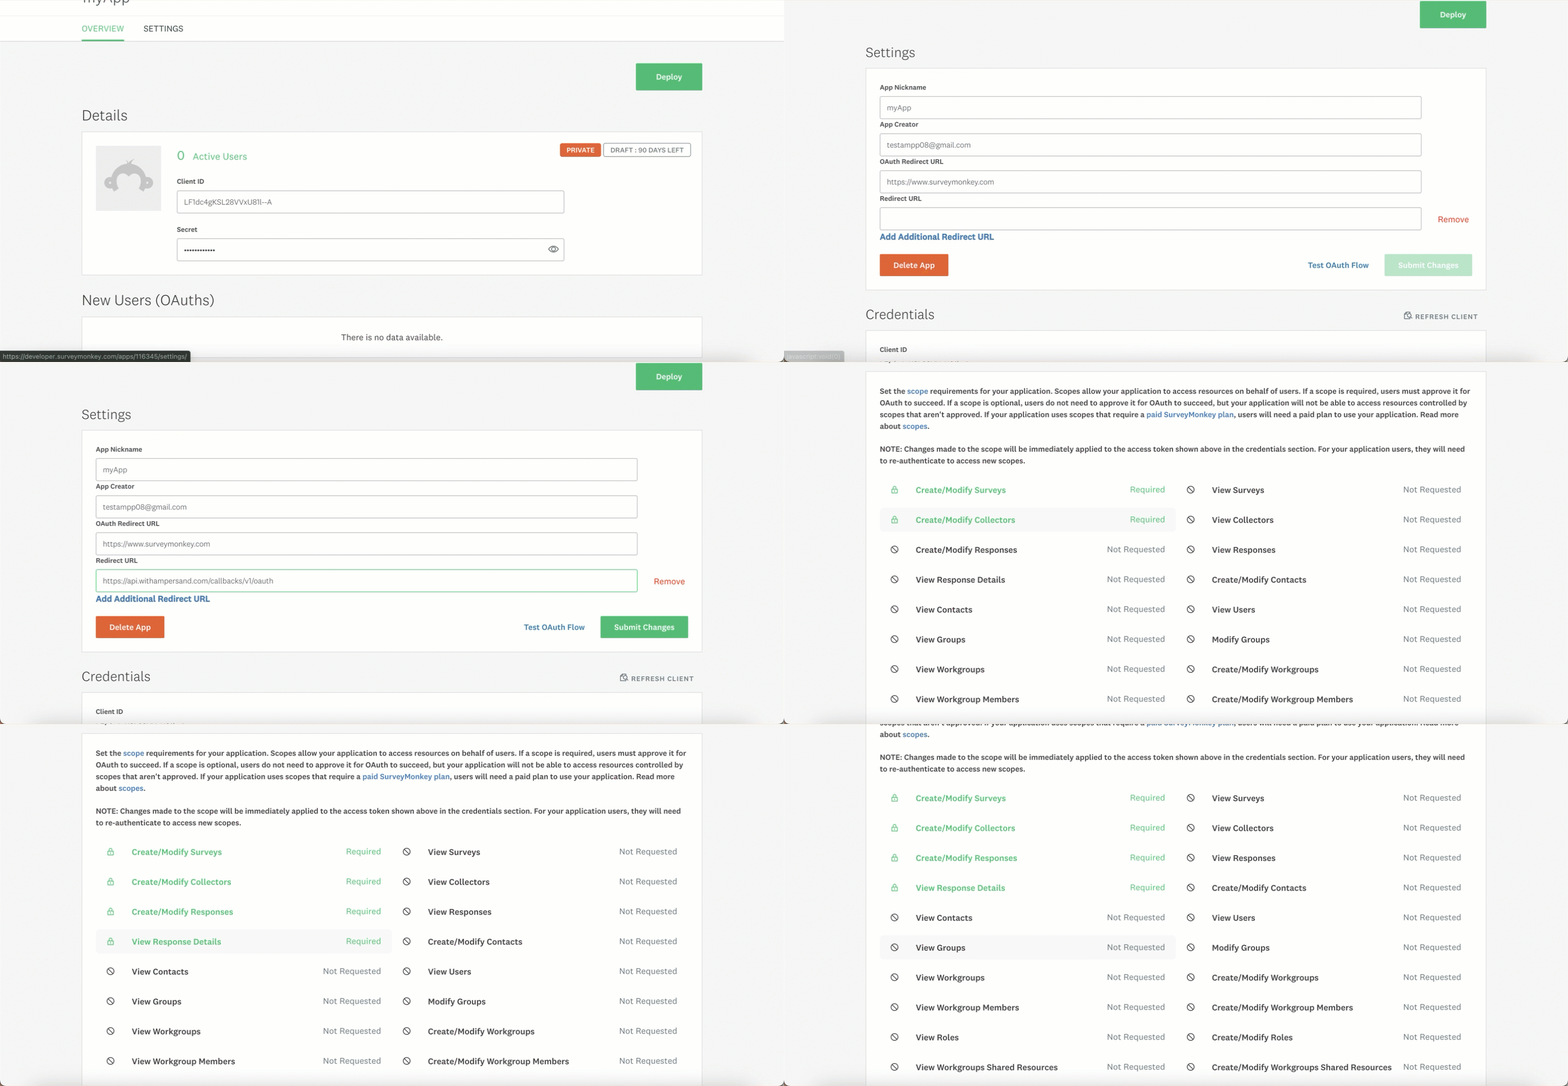
5. Click **Settings** on your app details.

6. In the Redirect URL section, click **Add Additional Redirect URL** and enter the Ampersand redirect URL: `https://api.withampersand.com/callbacks/v1/oauth`.

7. Click **Submit changes**.

8. From the **Scopes** section, select the scopes required for your application. Common scopes include:
   * **View Surveys** / **Create/Modify Surveys** — for reading and writing surveys
   * **View Contacts** / **Create/Modify Contacts** — for reading and writing contacts and contact lists

9. Click **Update Scopes**.

   <img src="https://mintcdn.com/ampersand-24eb5c1a-mintlify-0330937e/2CaNRa18PrvFr1Uk/images/provider-guides/74c56bc-surveymonkey2.gif?s=ef89241ec8f1791294affe5ec7819d3e" alt="SurveyMonkey App Details" width="1440" height="666" data-path="images/provider-guides/74c56bc-surveymonkey2.gif" />

   <br />

You can find the **Client ID** and **Client Secret** keys on the **Overview** page of your application. Note these keys, as they are essential for connecting your app to Ampersand.

Some scopes require a paid SurveyMonkey plan or additional approval for public apps. Configure only the scopes your integration uses.

## Add your SurveyMonkey app info to Ampersand

1. Log in to your [Ampersand Dashboard](https://dashboard.withampersand.com).

2. Select the project where you want to add the SurveyMonkey app.

   <img src="https://mintcdn.com/ampersand-24eb5c1a-mintlify-0330937e/2CaNRa18PrvFr1Uk/images/provider-guides/2fd1283-Ampersand.png?fit=max&auto=format&n=2CaNRa18PrvFr1Uk&q=85&s=8527cf37682665c4f6824a4dd594c1fb" alt="Ampersand Project Selection" width="2244" height="442" data-path="images/provider-guides/2fd1283-Ampersand.png" />

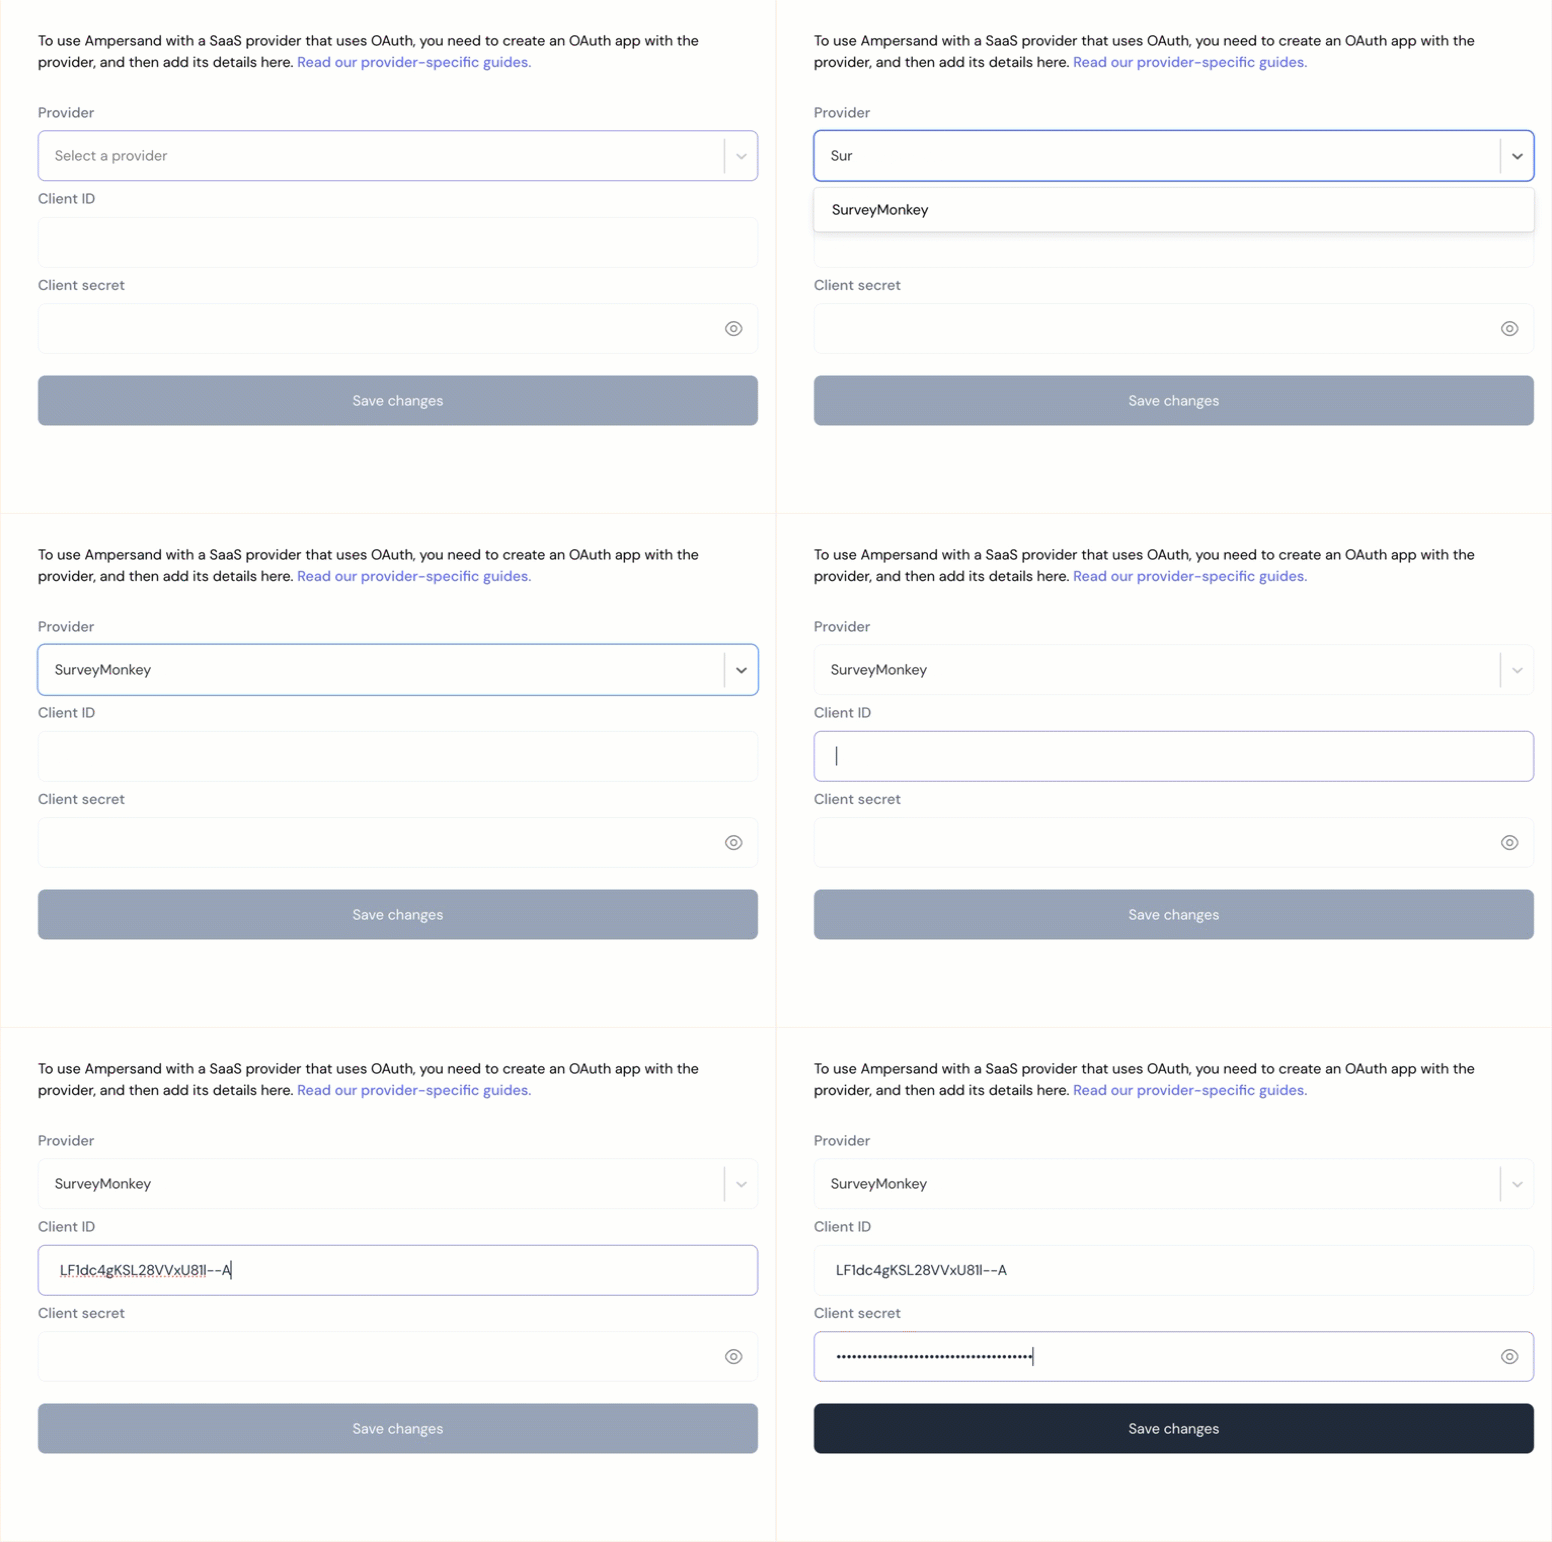
3. Navigate to the **Provider Apps** section.

4. Select **SurveyMonkey** from the **Provider** list.

5. Enter the previously obtained **Client ID** in the **Client ID** field and the **Client Secret** in the **Client Secret** field.
   <img src="https://mintcdn.com/ampersand-24eb5c1a-mintlify-0330937e/2CaNRa18PrvFr1Uk/images/provider-guides/67af4d6-surveymonkey3.gif?s=4ab77d7935be866ea9566fad467483a0" alt="SurveyMonkey Integration in Ampersand" width="776" height="514" data-path="images/provider-guides/67af4d6-surveymonkey3.gif" />

6. Click **Save Changes**.

## Using the connector

To start integrating with SurveyMonkey:

* Create a manifest file like the [example](https://github.com/amp-labs/samples/blob/main/surveyMonkey/amp.yaml).
* Deploy it using the [amp CLI](/cli/overview).
* If using Read or Write actions: create a [destination](/destinations).
* Embed the [InstallIntegration](/embeddable-ui-components#install-integration) UI component. The UI component will prompt the customer for OAuth authorization.
* Start using the connector!
  * If your integration has [Read Actions](/read-actions), you'll start getting webhook messages.
  * If your integration has [Write Actions](/write-actions), you can start making API calls to our Write API.
  * If your integration has [Proxy Actions](/proxy-actions), you can start making Proxy API calls.

## API documentation

* [SurveyMonkey API v3](https://api.surveymonkey.com/v3/docs)
